Monday, November 27, 2017

AUTHENTIQUE PAPER: Remember December Mini Album

I would like to say that I always finish every project, but that is not always possible when the holidays are right around the corner. To make the completion of my Colorful Christmas December Mini Album a reality, I decided to prep a few things early to make it a little easier to create during the upcoming busy season.

To start, I grabbed a container to keep everything in. This is an Ikea basket, but others are just as fantastic. Then I just started grabbing things from my stash. I have had some of these items for years!
I pulled stamps, washi tape, alphas, ribbons, wood pieces, enamel dots, and other fun embellishments to add to my mini as I go.
 The Colorful Christmas 6x6 Bundle is perfectly sized for projects like this.
I then grabbed my foundation pages. I bought a few of these foundation pages from a sale awhile back. The days would have been wrong, so I printed new day names on sticker paper and cut them out with scissors. Once I create each page, I'll either hand write, or type using my manual typewriter.
 Having each of the patterned papers pre-cut will save time when I start creating next month.
All I need to add is a stamp pad and a few colored pencils. Any leftovers could easily be turned into a couple of Christmas cards.
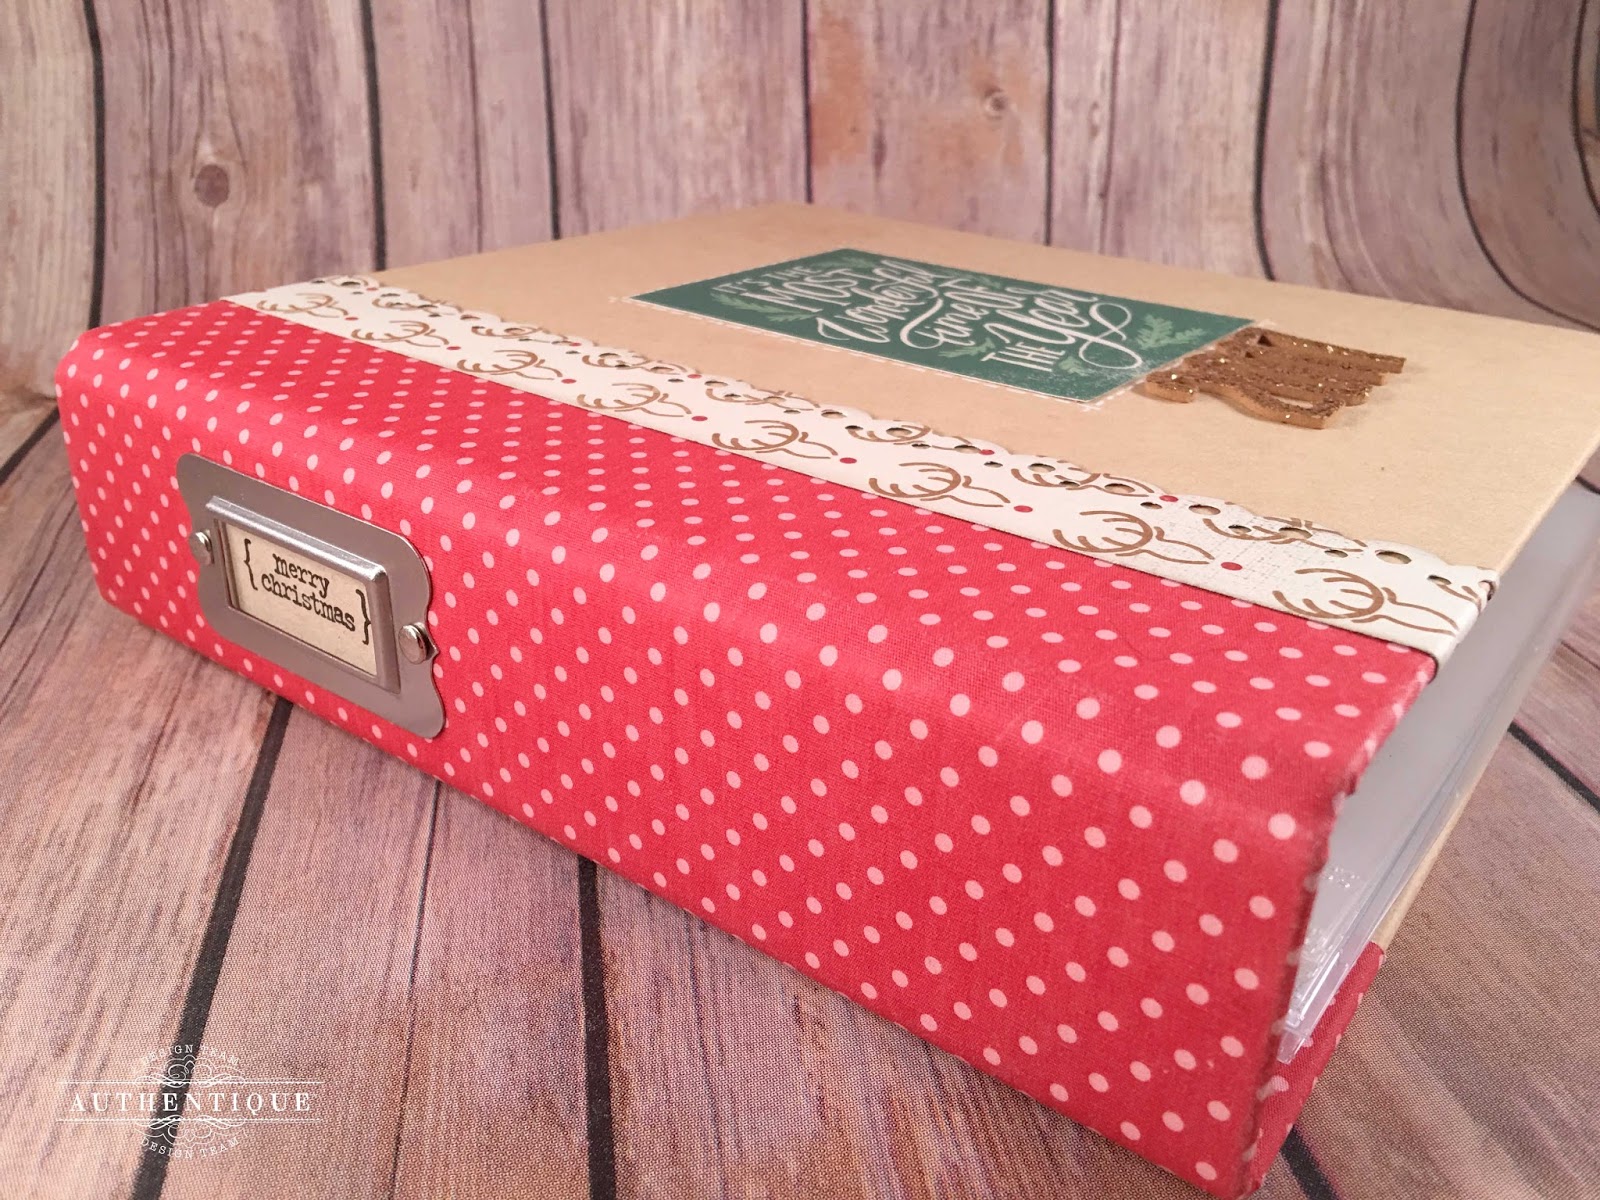
I found this cute album on sale, and gussied it up with a little punched reindeer edge, and a journaling card.
 Adding a little faux stitching makes this more personalized.
 Because I know that the first part of the month will be hectic, I created a few Colorful Christmas foundation pages to start.
 I wanted something for the inside cover, so used my Silhouette (#111484) to cut a large tree, and added a Details sticker and an enamel star. The "Story" page will have some of my hopes for the Christmas season, possibly a wishlist of fun events.
 The next three pages are to be used with the foundation pages. Each will sit on the larger squared section, with the journaling or messages below them.
Hopefully this inspires you to gather all of your supplies just a tad bit early for some fun December Mini Album making. A little preparation now, will make the project easier to complete.
Other Supplies Used: alphas (Thickers, chipboard and alpha stickers), various washi tapes, Twinery twine (Blossom, Cappuccino, Maraschino), ribbons, buttons, enamel dots & shapes, stamps (Lawn Fawn Milk & Cookies, Essentials by Ellen - Light Parade), mini album & inserts, Silhouette Online Store & Cameo
Pin It

Friday, November 24, 2017

AUTHENTIQUE PAPER: Frosty Winter Projects

Sometimes a paper collection is so easy to use, that I can create an entire set of cards or projects easily with it. Frosty Winter for me was this collection. Once I started using the fantastic violets and blues, I was hooked. 
  
I started with a fun layout. I really wanted something simpler than complicated. The patterns were just too gorgeous to add anything else. I wanted each to shine on their own, so used primarily straight cuts and layers, instead of more complicated shapes. A black and white photo kept from competing with the amazing violets and blues.
 To make the patterns stand out from one another, I used vellum between some of the layers, and as the snowflakes around the image.
 
 My favorite part of this collection is easy the tiny sentiment stickers that come on the Details sticker sheet. I just loved adding those throughout the layout.
 The tab stickers are also amazing. I loved adding all of the tiny snowflakes to this fun layout. Once the layout was complete, I could stop myself from creating MANY cards with all of the leftover bits and pieces of Frosty Winter.
I started with this adorable printable from Jessica Feig. I had to color him to match the colors of Frosty Winter. I cannot wait to send him to someone just for a smile.
An embossing folder, some scraps, and a little Glossy Accents made this snowglobe card sparkle.
Mirroring the snowflake sentiment on the Details Sticker with a stitched snowflake and embossing folder elevates this tone-on-tone beauty. 
A really simple trick to tone down the colors or patterns of a patterned paper is to place it under some vellum. The vellum is still translucent. so the snowflakes just peek through.
A deep impression, a little twine, and some beautiful sentiments make this an easy card to share.
Thank you for looking. I hope that you found some inspiration to get your Frosty Winter projects started.
Pin It

Monday, November 20, 2017

Paper Girls Challenge Blog: Gold

Good morning! Today's challenge on the Paper Girls Challenge Blog is Gold! I love anything that glitters, and this rose gold paper was itching to be all cut up.

I was fortunate enough to snag a few things from the Ellen Huston August sale, including this fantastic You Rock die set, and the Spread the Sparkle stamp set. I paired them with the rose gold glitter paper from Hobby Lobby and a Lawn Fawn Say Cheese die.
I popped up the gold frame onto a piece of white cardstock that I used both the Taylored Expressions Snowfall embossing folder, and the Lawn Fawn Small Stitched Rectangle Stackables die. The patterned paper is a scrap from my scrap pile, and I added some of the Nuvo Crystal Drops in Bubblegum.

Make sure that you join us on the Paper Girls Challenge Blog!  Pin It